
Creating SSL Certificates using CertBot Certificate Authoriy (CA) in Debian 8 Jessie
Creating SSL Certificates using Certbot in Debian Jessie 8.7:
Adding backport repository:
First of all, add the backport Repository to Debian apt repositories.
|
1 |
echo "deb http://ftp.debian.org/debian jessie-backports main" > /etc/apt/sources.list.d/backports.list |
Now update the apt package cache using the following command.
|
1 |
sudo apt-get update |
Installing CertBot Apache client:
Now Install the Certbot client using the following command.
Note: We are passing -t option to the installer, That means we are telling apt to install it from the jessie-backports repository.
|
1 |
sudo apt-get install python-certbot-apache -t jessie-backports |
Sample Output:
|
1 2 3 4 5 6 7 8 9 10 11 12 13 14 15 16 17 18 19 20 21 22 23 24 25 26 27 28 29 30 |
# sudo apt-get install python-certbot-apache -t jessie-backports Reading package lists... Done Building dependency tree Reading state information... Done The following packages were automatically installed and are no longer required: python-cffi python-ply python-pycparser Use 'apt-get autoremove' to remove them. The following extra packages will be installed: apache2 apache2-bin apache2-data apache2-utils augeas-lenses certbot dialog libapr1 libaprutil1 libaprutil1-dbd-sqlite3 libaprutil1-ldap libaugeas0 liblua5.1-0 python-acme python-augeas python-certbot python-cffi python-cffi-backend python-configargparse python-cryptography python-dialog python-dnspython python-enum34 python-funcsigs python-idna python-ipaddress python-mock python-openssl python-parsedatetime python-pbr python-pkg-resources python-psutil python-pyasn1 python-pyicu python-rfc3339 python-setuptools python-six python-tz python-zope.component python-zope.event python-zope.interface ssl-cert Suggested packages: apache2-doc apache2-suexec-pristine apache2-suexec-custom augeas-doc python-certbot-doc augeas-tools python-acme-doc python-certbot-apache-doc python-cryptography-doc python-cryptography-vectors python-enum34-doc python-funcsigs-doc python-mock-doc python-openssl-doc python-openssl-dbg python-psutil-doc doc-base python-setuptools-doc openssl-blacklist Recommended packages: letsencrypt The following NEW packages will be installed: apache2 apache2-bin apache2-data apache2-utils augeas-lenses certbot dialog libapr1 libaprutil1 libaprutil1-dbd-sqlite3 libaprutil1-ldap libaugeas0 liblua5.1-0 python-acme python-augeas python-certbot python-certbot-apache python-cffi-backend python-configargparse python-dialog python-dnspython python-enum34 python-funcsigs python-idna python-ipaddress python-mock python-parsedatetime python-pbr python-psutil python-pyicu python-rfc3339 python-tz python-zope.component python-zope.event python-zope.interface ssl-cert The following packages will be upgraded: python-cffi python-cryptography python-openssl python-pkg-resources python-pyasn1 python-setuptools python-six 7 upgraded, 36 newly installed, 0 to remove and 136 not upgraded. Need to get 4,754 kB of archives. After this operation, 17.0 MB of additional disk space will be used. Do you want to continue? [Y/n] Y |
Now Certbot Apache client is installed on your server. You can request SSL certificates from the Let’s Encrypt or CertBot Certificate authority aka CA.
Note : python-certbot-apache client package installs the apache server if it is not installed already.
Generating the SSL Certificates using CertBot Certificate Authority (CA):
|
1 |
sudo certbot --apache -d test.sillycodes.com |
Replace the test.sillycodes.com with your Domain name.
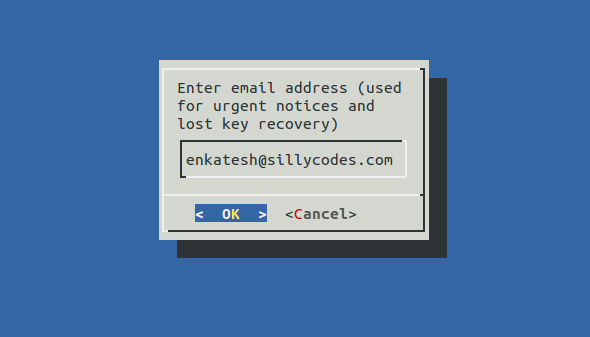
Then you will be prompted for the recovery mail id, Give one mail this mail is useful for you to recover your certs if you lost. So give one Email-ID and press OK. Please see the following image.
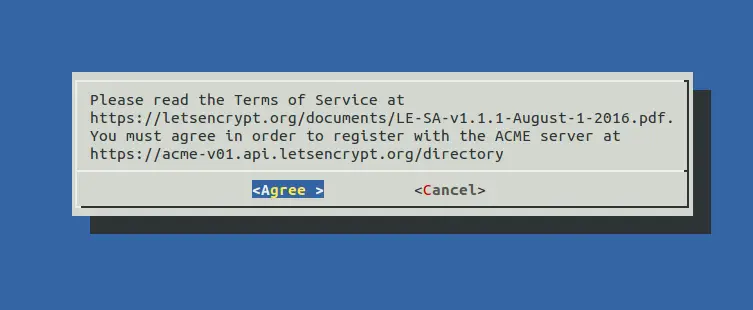
It will also, asks you to accept the Let’s Encrypt Subscriber Agreement. Press the Agree.
Now, CertBot client app will ask for the type of Security.
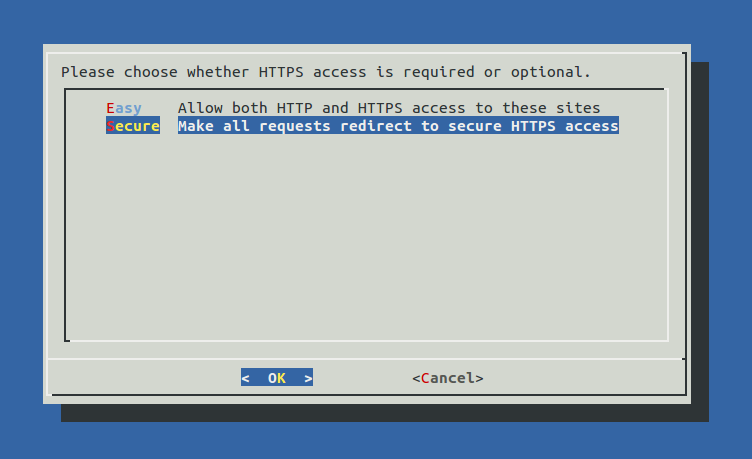
We have two options here,
- Easy – It will allow both HTTP and HTTPS connections.
- Secure – It will redirect all HTTP requests to HTTPS, So all connections to our server will be made using HTTPS.
I choose Secure So that all connections to my server will be encrypted. You can choose Easy If any of your applications need HTTP.
It will also provide a link where you can check the HTTPS status of your Server.
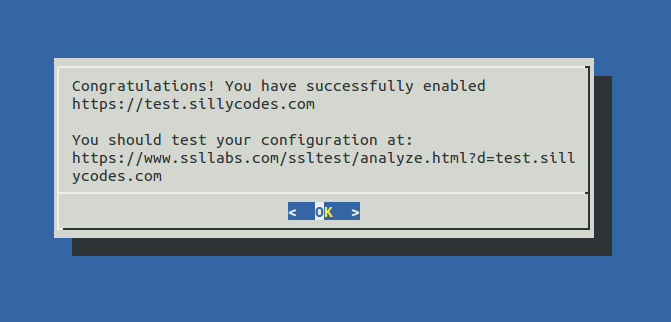
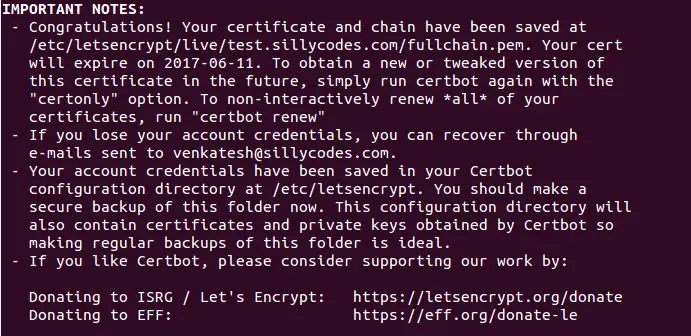
If everything went well, You will be presented with a congratulations screen saying you are successfully created and installed SSL certificates, This screen also shows the expiry date of the certificates and Location of the certificates.
Few Notes:
- Presently default expiry date for the certificates is three months from the day of creation i.e 90 days.
- Let’s encrypt can not create SSL certificates for the IP Addresses, You must need one domain name.
- Now your SSL certificates are available under the /etc/letsencrypt/live folder.
Checking SSL Certificates Status:
Now, Open your web browser and try to connect to it using https. If everything went well you will see green https connection. you can also see it is signed by let’s encrypt CA or CERTBOT CA.
https://yourdomain.com

You can also test your websites SSL certification encryption status by visiting following URL.
https://www.ssllabs.com/ssltest/analyze.html?d=yourdomain.com&latest
Replace the yourdomain.com with your domain name.
Renew :
You can renew the SSL certificates using the following command.
|
1 |
sudo certbot renew |
Setting up Cron Job to Renew CertBot SSL Certificates automatically:
We can use the following cronjob to renew the SSL Certificates automatically. First of all Open the Crontab using following command.
|
1 |
crontab -e |
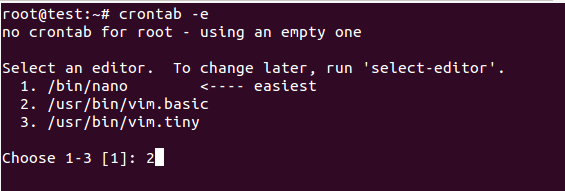
Select your favorite editor by giving the number, Here I am using vim.basic. If your beginner in linux, I recommend you to choose nano.
Then go to the bottom of the crontab and paste the following command and save the file.
|
1 |
0 0 * * 1 certbot renew >> /var/log/Certbot-renew.log |
What will above cronjob do:
Above cron will run on every Monday 0:00 server time. This will try to update the SSL Certificates. By default, the certbot application will renew the certificate if it is within 30 days of expiring. I chose to run the command every week to be safe.
That’s it, Congratulations, You’re successfully created and Installed SSL certificates for your Apache web server.


1 Response
[…] our previous post, We discussed how to install SSL Certificates from Certbot or letsencrypt CA in Debian. Now in this tutorial, we will try to create the SSL certificates in Ubuntu 14.04 server. […]